Wednesday, June 17, 2009

TWD - Honey Peach Ice Cream


Okay, so this post is more like Wednesday With Dorie. Although I made the ice cream a few days ago, I got caught up in life and couldn't post until today. Apologies! Anyway, on with the show.

This week's recipe was chosen by Tommi of Brown Interior. Oh Tommi, you picked a perfect week for ice cream...we're starting to actually get a summer this week, so this was a most welcome dessert!

I just started making ice cream last year, and I love it. You can make it without a machine, but if you have one it's much easier than you'd think - and far tastier than anything store bought. Better than Hagen Daas, even. Homemade ice cream has so little ingredients - just milk, cream, eggs, sugar, vanilla, and maybe some fruit (or chocolate, YAY). That's it. Is it any wonder it tastes so good? And the flavours so pure? And my ass is so big?

This ice cream is custard based, which is some people find tricky to make. Custard ice cream has egg yolks in its base, which is what thickens the ice cream. Other ice cream recipes use cornstarch to thicken, so if you are scared of the egg yolk thing, start off with a simpler recipe.

First, I beat the eggs with sugar until they were pale yellow and thick.


Aren't they pretty? They look good enough to eat right here, but I'm betting they wouldn't taste that great. Next time I have a kid around, I'll get them to experiment for me. Kids are great for that - just tell them it has sugar in it, and they'll eat just about anything. Save your tastebuds, fatten a child!

Next, you simmer your peaches in 1/4 cup of honey until they are soft, and then blend them together. Set it aside until your custard is done.

Now, for the custard base! Seriously, this is simple. Heat some cream and milk to boiling, and then slowly drizzle about a third into the sugar/egg mix, whisking all the while. Give it a good whisk, then add the rest of the hot liquid while stirring. Return the mixture to the stove, and stir continuously until it thickens enough to coat the back of a spoon. It took me under 5 minutes to reach this stage, although I have cooked custards longer to get to that point.


Once your custard is done, remove from the heat and strain it into a clean heat proof bowl. Add the peach puree, and chill for a few hours at least. The peach puree swirl made patterns in the custard...quite mesmerizing, really. Maybe I will start a business reading fortunes in ice cream swirls.

When chilled, pour the whole mixture into your ice cream maker, and let it churn its little heart out. And then try not to eat the whole thing immediately. I actually made it last a few days this time. VICTORY IS MINE!

Things I learned:

1) This ice cream calls for chopped peaches added during the freezing process. Some people didn't like frozen bits of peaches, but I loved it. Then again, I cut up peaches and freeze it just to eat on a hot day.

2) If you are new to making custards, make sure you strain the mixture through a seive at the end. The worst thing that can happen when making a custard is that the eggs cook a bit; if that happens, the seive will catch any solid bits, and you'll have a lovely smooth ice cream.

3) The peach and honey flavour was subtle, but I quite liked it. I REALLY like peaches, however, so next time I might up the cooked peaches or possibly add some peach juice.

4) Real ice cream freezes like a brick; the stuff you buy in the store has additives to make it scoopable. If you want a softer ice cream, put 1-2 tsp of vodka in your custard. I did that, and it had a perfect consistancy. Drawback? I could grab my container out of the freezer and eat it at will. And my will is weak.


See? Yeah....this was supper. Good thing I'm not setting an example for anyone.

Saturday, June 13, 2009

Falafel


Today's post is, shockingly, non-baking related. I do eat things besides dessert, you know. Although it has seemed that lately, I'm making dessert more than real food. Whatever, it's all good.

I don't know about the rest of you, but lunch is one of my hardest meals to create. Supper is my big meal, but what the hell do you make for lunch? Generally, I don't want to spend a lot of time cooking midday, nor do I want something heavy in my belly. Most often, I'm eating leftovers from last night's meal, or KD, Alphagetti, or something equally hideous. It's not what I like, but it's quick and easy.

It's not satisfying, though. Even though lunch is a quick meal for me, I want something good, dammit! Is that too much to ask? Also, I go to the gym occasionally in the morning, and when I come back I am RAVENOUS. I'd much rather eat something good for me and filling then processed crap.

And that's where Falafel comes in. It's prepared in advance and frozen, so it's always available. It's incredibly healthy - chickpeas are packed with protein and nutrients and stuff. That in turn makes it filling (and protein is great after a workout - helps your muscles heal). Most importantly, it's tasty as hell.

Tuesday, June 9, 2009

TWD - Parisian Apple Tartlets


This week's Tuesdays With Dorie recipe is Parisian Apple Tartlets, chosen by Jessica of My Baking Heart. I think it's the simplest dessert I've ever baked; all you do is cut a round of puff pastry, top it with sliced fruit, brown sugar, and butter, then bake for about 25 minutes. Even someone who's never baked in their life can make this with ease (and look like you've been baking for years!).

The hardest part in making this wee little pie is finding the puff pastry. You can make your own, but Jesus, even I have a limit. Dorie recommends using all-butter puff pastry, rather than the kinds that use all shortening, for obvious reasons: taste! I know some of my fellow bloggers paid as much as $10 for their all-butter pastry; I bought President's Choice pastry at the Superstore for $3.29. God love ya, Superstore....you really are worth switching stores.

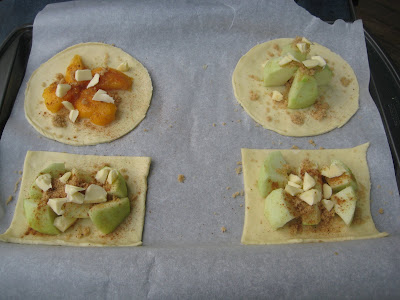
SO. Anyway. Cut 4 inch rounds out of the pastry, and fill it with your toppings. I got 2 rounds and 2 rectangles; I've never worked with puff pastry before, and wasn't sure if you're supposed to roll it out and such, so I just cut rectangles out of the remainder.

Also, I'm lazy. I should make a hotkey for that sentence.


See how easy that is? I made one peach for myself, because I hate mushy apples. Sacrilidge, perhaps. But it's my damn blog. The round apple tartlet is done to Dorie's specifications; the others have cinnamon and nutmeg added.


And here is my tartlet. God I love baked peaches. Even so, I'm not sure if I would make this again, but that's mainly because I don't care much for pies. My parents loved the apple ones, though - hence no pictures. They gobbled them up before I could snap a shot. They're like that. I tried to explain that I needed pics for my blog, but after "what's a blog??" I just gave up.

Things I learned:

1) Be careful when you add the butter; make sure it's in the centre of the fruit, or it might run under the tart as it melts and cause the bottom to burn. Burnt cheese is great; burnt butter? Not so much.

2) I quartered the apple half the way I thought it looked in Dorie's book, but I found that one took the longest to bake by far. I'd recommend you cut your fruit in 1 inch chunks so they cook quicker (and that way, the pastry won't overbake, either). Not as pretty, but it's effective.

3) Adding a pinch of cinnamon and nutmeg really amps up the flavour; Mom liked this combo best. She said tasted more strongly of apples, so if you want a pure apple flavour leave out the spices.

And the last thing I learned? Well, any pie/tartlet/cake/spoon/bare fingers/etc. is ALWAYS better with real whipped cream.


Next week's TWD: Coconut Pineapple Daquoise. No, I have no idea what that is either...tune in and see! And I'll have real food again soon, I promise.

Friday, June 5, 2009

Mom's Chocolate Fudge Cookies


Here's the thing: I'm a chocolate addict. I adore chocolate in all its forms (not white chocolate, though - but technically, it's not even chocolate. In fact, it's just wrong, sick and wrong.). I have no willpower when it comes to chocolate, and these sinful little cookies are no exception. This recipe has been in my family for over 75 years, and when you can say that you know you've got a good thing going on. They are soft and cakey, but they hold up great for transport, mailing to friends, or in the cookie jar. The best thing? They are actually BETTER the next day. I can't tell you how good they are 2 or 3 days after they've been baked; I've never had them last that long.

This time around, I decided to try them with some cinnamon, which I greatly enjoyed. Next time, I might add some freshly grated ginger and see how that works. If you want a deep, fudgey cookie, though, just make them as is - you won't be disappointed.

A couple of notes: These cookies are fine if you underbake them slightly, but don't overbake them; they get too dry and you won't have that soft, fudgey texture that really defines the cookie. Also, I know that shortening is the devil now, but whatever - these cookies are great. I've never made them with butter, but if you want to sub it in, make sure you watch your baking times carefully; I find butter causes cookies to brown quicker. Finally, I would recommend lining your cookie sheet with parchment, even if it's non-stick; burnt bottoms on these cookies would be a travesty.


Mom's Chocolate Fudge Cookies

1 1/2 cups brown sugar
1/2 cup shortening
1 egg
1/2 cup milk
1 tsp vanilla
2 cups flour
2 tsp baking powder
1 tsp salt
6 heaping tbsps cocoa, sifted
1 tsp cinnamon (optional)

1. Beat brown sugar and shortening together until well combined. Add egg, milk, and vanilla, and mix until fully incorporated.

2. Mix remaining ingredients in a separate bowl and then add to the remaining ingredients. Mix until just combined.

3. Drop dough by the spoonful onto a cookie sheet lined with parchment. Bake in a 375 degree oven for 10-12 minutes.


I defy you to eat just one of these.

Tuesday, June 2, 2009

TWD - Cinnamon Squares


I had been thinking of starting a food blog for awhile now, but Tuesdays With Dorie (TWD) was the catalyst. This post will be my first time baking with the group, and WOW was it ever worth it. Tracey from Tracey's Culinary Adventures choose this week's recipe, Cinnamon Squares. You can find the recipe on her blog. I had my eye on these squares for weeks, and never got around to making them; I can see that TWD will quickly become my most favourite reason for baking decadence.